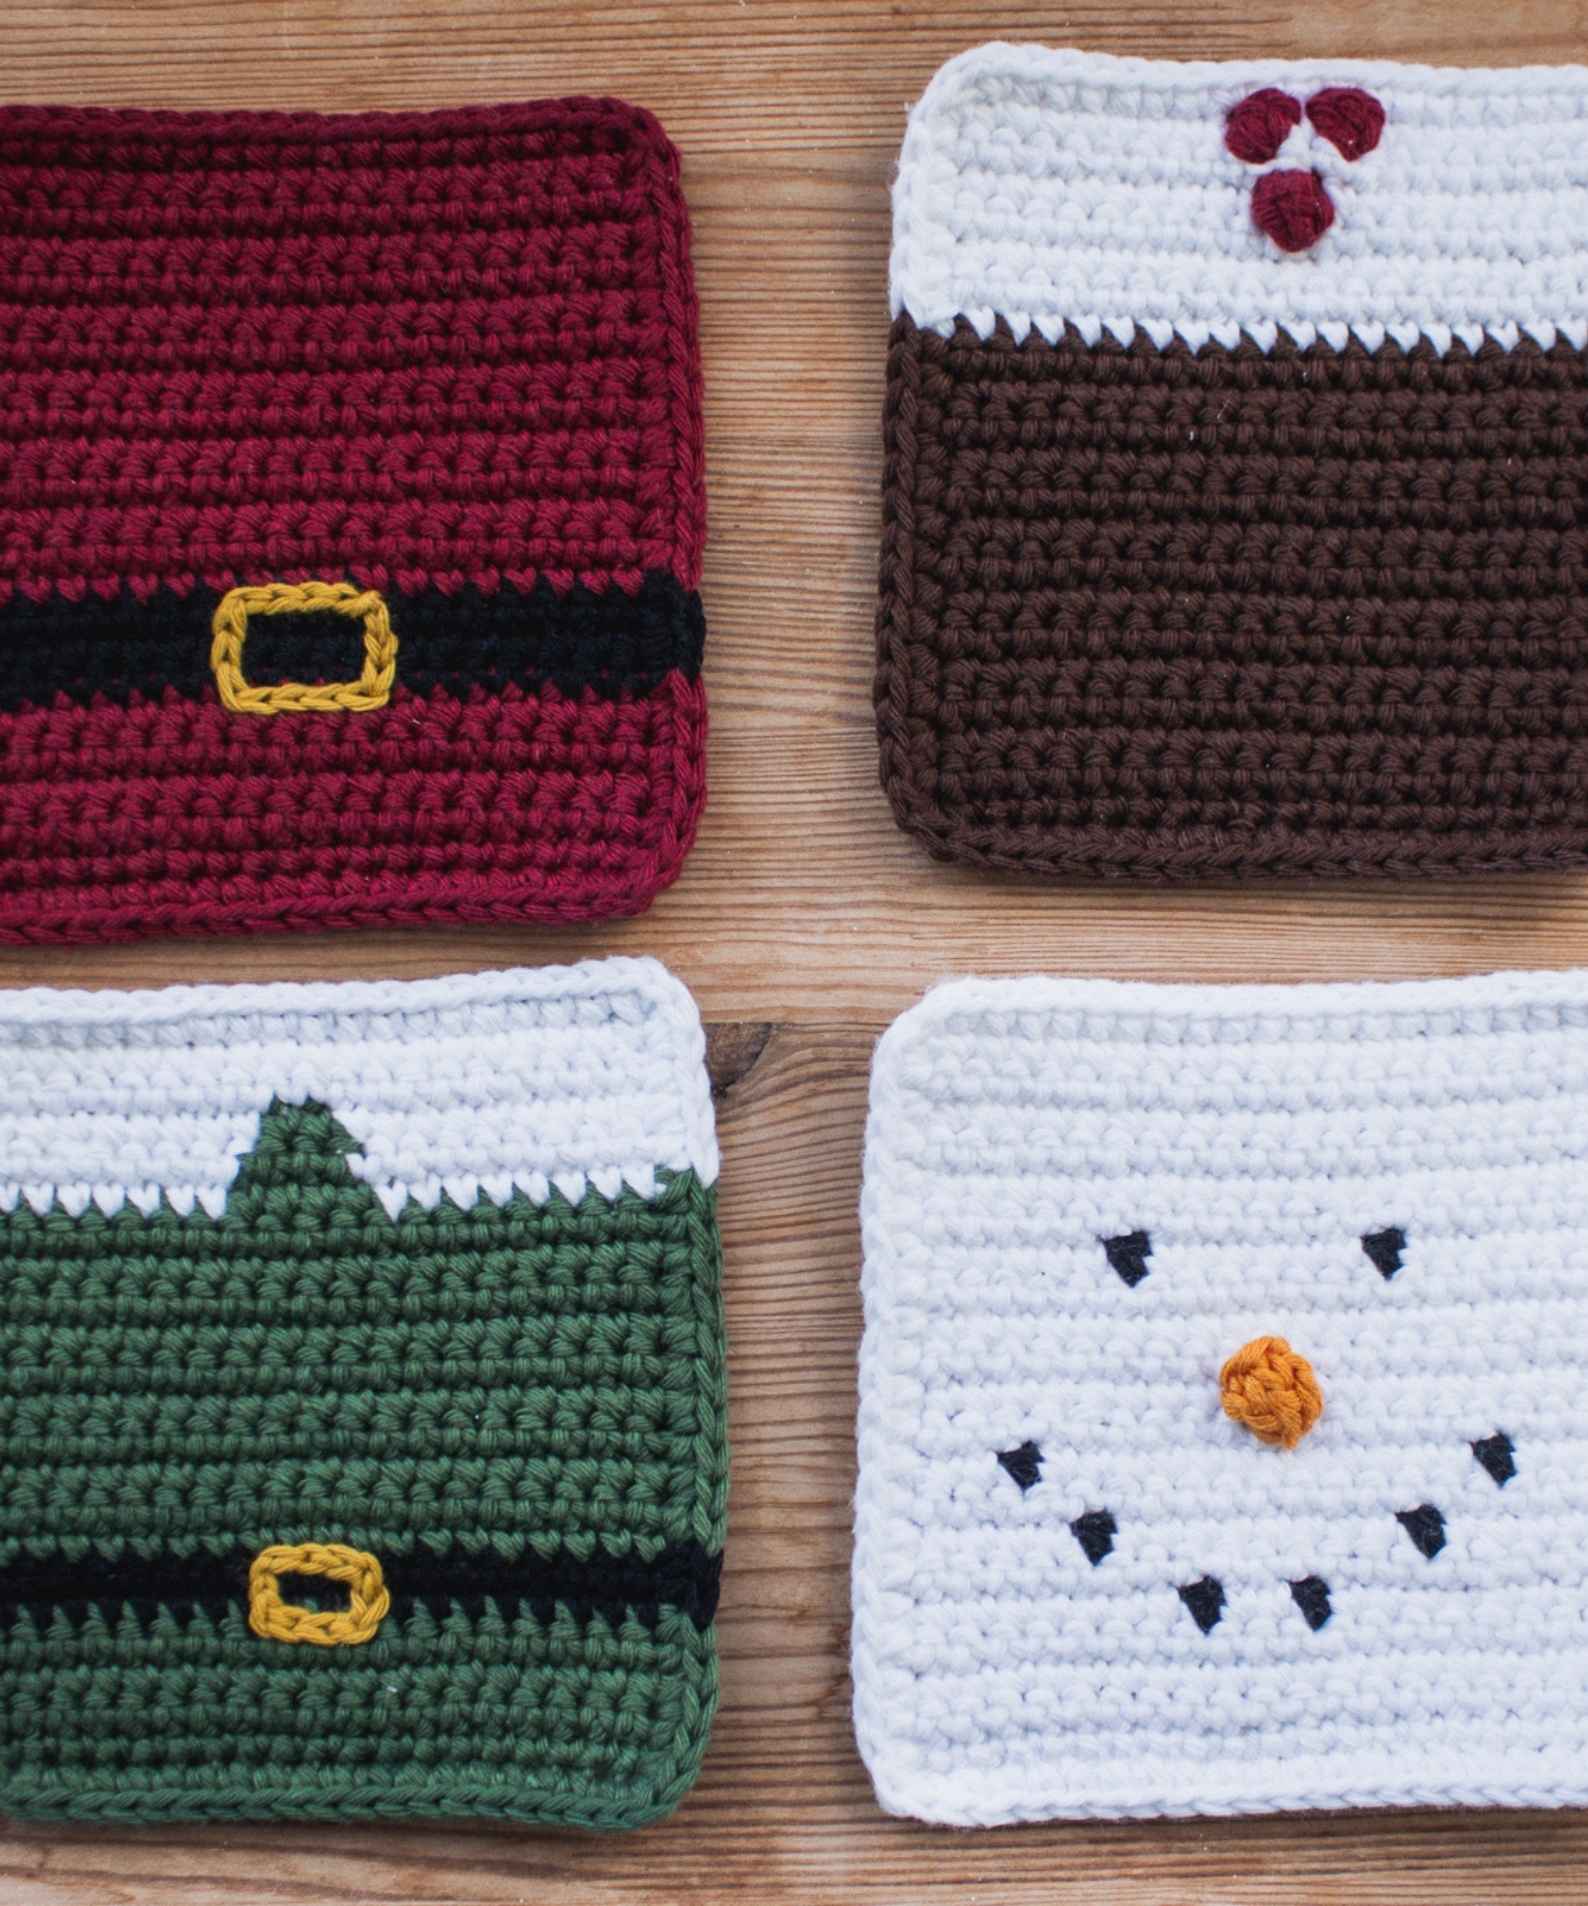

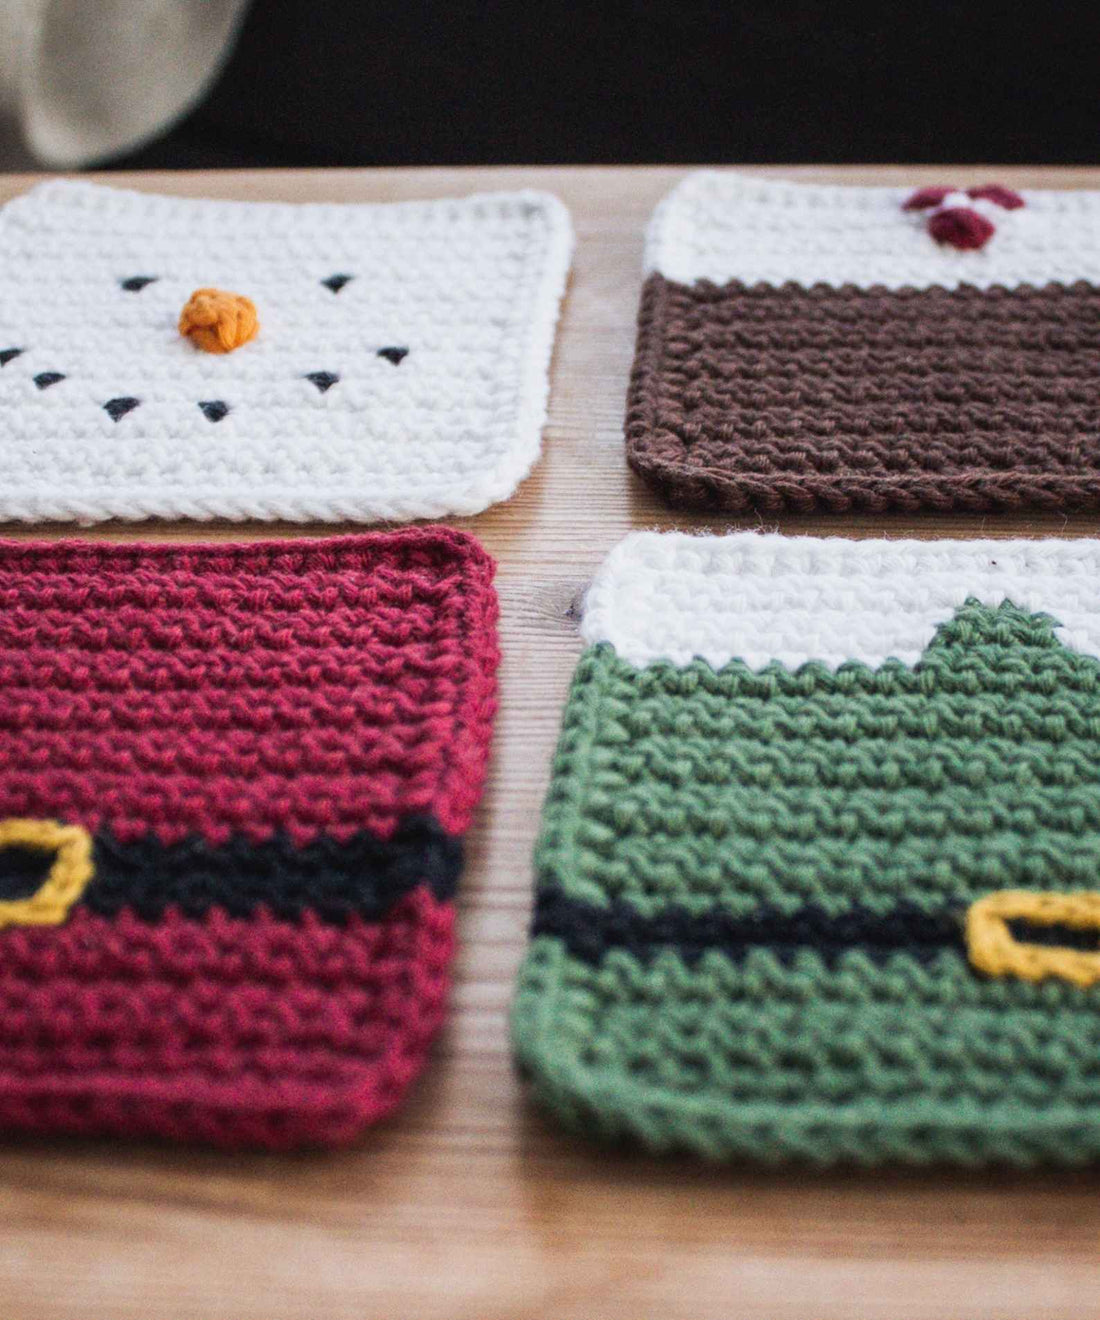
The Christmas Coasters - Crochet Pattern
It’s time to get your crochet on with these fun, festive, stylish Christmas coasters. They are really popular (thank you!) which means every year they come out of storage to bring joy to lots of families celebrating the holiday season! It genuinely thrills me to imagine it and I’m DELIGHTED you’re here and ready to make your own collection.
Will you make one of each design until you have enough for your Christmas table? Or do you have a favourite you’re going to max out on for a matching, cohesive vibe? OR are you going to theme your coaster allocations (e.g. Santa Coats for the parents, Christmas Puddings for the Grandparents, Snowmen for the kids and Elf Coats for the friends + extras)?
It will hopefully excite you to know that I caught a whisper from the North Pole that a second set of Christmas coasters would be hitting the studio soon… *UPDATE (Dec 2022): They're here! Check out the new set of Christmas coasters!*
A quick heads up on the yarn + tools
I’m going to put in a strong bid for choosing 100% cotton yarn. It’s hardy, absorbent, soft yet sturdy, washable, colourful and affordable. There are lots of great choices out there but I struggle to find cotton yarn that beats Sugar ‘N Cream or Drops Paris.
This may be controversial, but I size down a hook for projects like this where I want to minimise gaps and maximise sturdiness. You may notice in the pictures that the coasters look kinda tight and neat and (dare-I-say) satisfyingly un-floppy? They also give a reassuring plop when thrown onto a table.
If you find it tricky or uncomfortable or just don’t like the results of sizing down your hook, by all means use the hook suggested on the yarn label and ignore my guidance! Enjoying your making journey is priority number one for me (very closely followed by LOVING your finished item). But do note that your Christmas coasters will come out a little bigger and they’ll be more flexible.


What you'll need to make your Christmas coasters
Some links are affiliate, meaning I may make a small commission if you make a purchase, but this is at no cost to you.
- 4mm crochet hook (or correct size for your preference/gauge)
- Tapestry needle
-
Scissors
FOR THE SANTA COAT: - 25g red cotton yarn
- 10g black cotton yarn
- 20cm length of gold/yellow cotton yarn
FOR THE CHRISTMAS PUDDING: - 20g brown cotton yarn
- 15g white cotton yarn
- 30cm length or red cotton yarn
FOR THE ELF JACKET: - 25g green cotton yarn
- 10g black cotton yarn
- 5g white cotton yarn
- 20cm length of gold/yellow cotton yarn
FOR THE SNOWMAN: - 30g white cotton yarn
- 5g black cotton yarn
- 15cm length of orange cotton yarn
The Crochet Stitches + Techniques You’ll Need to make your Christmas coasters
If you're a total beginner to crochet, you may like to check out my Getting Started playlist. It's designed to show you the absolute basics to get you going with any project.
This blog uses UK crochet terminology
Click on the stitch name to view a video tutorial of the technique. Note: there are video tutorials of how to mini bobble and mini popcorn in the PDF pattern of these Christmas coasters.
- ch – chain : yarn over, pull through a loop
- dc – double crochet (US single crochet) : insert the hook, yarn over and pull through a loop. You’ll have two loops on your hook. Yarn over and pull through both loops.
- tr – treble crochet (US double crochet): yarn over, insert the hook and pull through a loop (3 loops on your hook). Yarn over, pull through two loops (now 2 loops on your hook). Yarn over and pull through both loops to finish the stitch.
- mini bobble : Yarn over, insert the hook and pull through a loop. You’ll have three loops on your hook. Yarn over, insert the hook again and pull through another loop. You’ll have five loops on your hook. Yarn over and pull through all five loops.
- mini popcorn: Yarn over, insert the hook and pull through a loop (3 loops on hook). Yarn over and pull through two loops. Yarn over, insert the hook again, pull through another loop (4 loops on hook). Yarn over and pull through two loops. Yarn over and insert the hook a third time and pull through a loop (5 loops on hook). Yarn over and pull through two loops. Yarn over and pull through all 4 loops.
- Popcorn : Work five treble crochets into the same space. Remove hook, leaving the dropped loop visible and accessible. Insert hook through the top of the first treble worked, and then through the dropped loop. Yarn over and pull through both loops to complete.
-
Traverse slip stitch : Used to add detail on top of crochet items. With right side facing you, insert your hook where you’d like to begin the embellishment, and pull through a loop. Insert your hook again, one stitch in any direction, and pull a loop through the work, and through the loop on your hook. Repeat until you reach the desired finish point.
Some notes before you begin making your Christmas coasters
This free pattern here on the Sarling Studio blog is a sample of the full PDF pattern available here. The full pattern;
- can be downloaded in UK or US crochet terms
- includes step by step pictures
- has a link to additional video tutorials, including how to achieve seamless colour changes
- can be purchased on Etsy or Ravelry if you prefer

Additional Useful Pattern Info
- Just in case you missed it above, this blog pattern is written in UK crochet terminology.
- If you size down your hook, your coasters should measure 12cm x 12cm.
- In the pattern table, the column on the right is the number of stitches each row should have
- Turning chains are not included in the stitch count
- Odd rows will be the right side of your work
- Each advanced stitch (mini popcorn, mini bobble, popcorn) are worked in a highlight colour, to create a berry, a piece of coal or a carrot nose. To ensure seamless colour transitions, we’ll always begin working the highlight colour on that stitch (not before) and we’ll complete the stitch (final yarn over and pull through) with the base colour (white). Video support for this technique is in the PDF.
Crochet Christmas Coasters Pattern
SANTA COAT
| Foundation | Working in red yarn, begin with a chain of 21. | 21 |
| Row 1 | Dc into second chain from hook (stitch 20 in your starting chain) and each stitch across. Ch1 turn. | 20 |
| Rows 2 – 5 | Dc into each stitch across. Ch1 turn. In last stitch of row 5, switch to black yarn. | 20 |
| Rows 6 – 8 | Dc into each stitch across. Ch1 turn. In last stitch of row 8, switch to back to red yarn. | 20 |
| Rows 9 – 20 | Dc into each stitch across. Ch1 turn. | 20 |
| Row 21 | Dc19, dc2 into the final stitch. | 21 |
| Border | Turn the work 90° clockwise and dc into the side of each row along the left side (switch to black yarn for the three stitches worked into rows 6-8), then dc2 into the corner. Turn the work 90° clockwise again and dc along the bottom, dc2 into the corner. Turn 90° clockwise before dc along the right side (again, switch to black yarn for the three stitches into rows 6-8), dc2 into last corner before dc along the top. Fasten off and weave in ends. | 84 |
| Buckle | Traverse slst the belt buckle in gold yarn. With right side facing you, begin your traverse slst on row 8 (the top of the black belt) in the 9th stitch from the right: 1. Work 4 slst along (working over the 9th, 10th, 11th and 12th stitch to ensure your buckle is centred). 2. Turn 90° clockwise and work 3 slst over rows 8, 7 & 6. 3. Turn 90° clockwise again and work 4 slst along row 5 (just below the black belt). Note: these should run parallel to your first 4 traverse slst. 4. Turn 90° clockwise again and work 3 slst back up over rows 6, 7 and 8 to rejoin where you started. |
14 |
| Finish | Fasten off and weave in ends. |
CHRISTMAS PUDDING
| Foundation | Working in brown yarn, begin with a chain of 21. | 21 |
| Row 1 | Dc into second chain from hook (stitch 20 in your starting chain) and each stitch across. Ch1 turn. | 20 |
| Rows 2 – 14 | Dc into each stitch across. Ch1 turn.
In last stitch of row 14, switch to white yarn. |
20 |
| Rows 15 – 18 | Dc into each stitch across. Ch1 turn. | 20 |
| Row 19 | Dc9, mini popcorn in red, dc10. Ch1 turn. | 20 |
| Row 20 | Dc into each stitch across. Ch1 turn. | 20 |
| Row 21 | Dc8, mini popcorn in red, dc1, mini popcorn in red, dc8, dc2 into the final stitch. | 21 |
| Border | Turn the work 90° clockwise and dc into the side of each row along the left side (switch to brown yarn when you work into row 14), then dc2 into the corner. Turn the work 90° clockwise again and dc along the bottom, dc2 into the corner. Turn 90° clockwise before dc along the right side (switch back to white yarn when you work into row 15), dc2 into last corner before dc along the top. | 84 |
| Finish | Fasten off and weave in ends. |
ELF JACKET
| Foundation | Working in green yarn, begin with a chain of 21. | 21 |
| Row 1 | Dc into second chain from hook (stitch 20 in your starting chain) and each stitch across. Ch1 turn. | 20 |
| Rows 2 – 4 | Dc into each stitch across. Ch1 turn.
In last stitch of row 4, switch to black yarn. |
20 |
| Rows 5 – 6 | Dc into each stitch across. Ch1 turn.
In last stitch of row 6, switch back to green yarn. |
20 |
| Rows 7 – 16 | Dc into each stitch across. Ch1 turn.
In last stitch of row 16, switch to white yarn. |
20 |
| Row 17 | Dc8 white, dc4 in green, dc8 white. Ch1 turn. | 20 |
| Row 18 | Dc9 white, dc3 green, dc8 white. Ch1 turn. | 20 |
| Row 19 | Dc9 white, dc2 green, dc9 white. Ch1 turn. | 20 |
| Row 20 | Dc into each stitch across. Ch1 turn. | 20 |
| Row 21 | Dc19, dc2 into the final stitch. | 21 |
| Border | Turn the work 90° clockwise and dc into the side of each row along the left side (switch to green yarn at row 16 and to black yarn for the two stitches worked into rows 5&6), then dc2 into the corner. Turn the work 90° clockwise again and dc along the bottom, dc2 into the corner. Turn 90° clockwise before dc along the right side (again, switch to black yarn for the two stitches into rows 5&6, and to white at row 17), dc2 into last corner before dc along the top. Fasten off and weave in ends. | 84 |
| Buckle | Traverse slst the belt buckle in gold yarn. With right side facing you, begin your traverse slst on row 7 (the top of the black belt) in the 9th stitch from the right: 1. Work 3 slst along (working over the 9th, 10th & 11th stitch to ensure your buckle is centred under the collar). 2. Turn 90° clockwise and work 2 slst over rows 6 & 5. 3. Turn 90° clockwise again and work 3 slst along row 4 (just below the black belt). Note: these should run parallel to your first 3 traverse slst. 4. Turn 90° clockwise again and work 2 slst back up over rows 5 & 6 to rejoin where you started. |
10 |
| Finish | Fasten off and weave in ends. |
SNOWMAN
| Foundation | Working in white yarn, begin with a chain of 21. | 21 |
| Row 1 | Dc into second chain from hook (stitch 20 in your starting chain) and each stitch across. Ch1 turn. | 20 |
| Rows 2 – 4 | Dc into each stitch across. Ch1 turn. | 20 |
| Row 5 | Dc8, mini bobble in black, dc2, mini bobble in black, dc8. Ch1 turn. | 20 |
| Row 6 | Dc20. Ch1 turn. | 20 |
| Row 7 | Dc5, mini bobble in black, dc8, mini bobble in black, dc5. Ch1 turn. | 20 |
| Row 8 | Dc20. Ch1 turn. | 20 |
| Row 9 | Dc3, mini bobble in black, dc12, mini bobble in black, dc3. Ch1 turn. | 20 |
| Row 10 | Dc20. Ch1 turn. | 20 |
| Row 11 | Dc9, popcorn stitch in orange, dc10. Ch1 turn. | 20 |
| Rows 12 – 14 | Dc20. Ch1 turn. | 20 |
| Row 15 | Dc6, mini bobble in black, dc6, mini bobble in black, dc6. Ch1 turn. | 20 |
| Rows 16 – 20 | Dc20. Ch1 turn. | 20 |
| Row 21 | Dc19, dc2 into the final stitch. | 21 |
| Border | Turn the work 90° clockwise and dc into the side of each row along the left side then dc2 into the corner. Turn the work 90° clockwise again and dc along the bottom, dc2 into the corner. Turn 90° clockwise before dc along the right side, dc2 into last corner before dc along the top. Fasten off. | 84 |
| Finish | Weave in all ends. |
Did you enjoy this pattern?
If so, I’d love you to tag me on Insta to share your work with me! @sarling.studio